 |
Home | |
ARCHIVE |
|
|
Home | |
ARCHIVE |
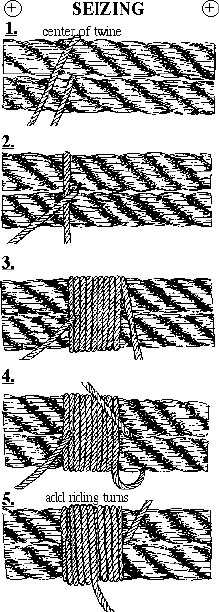
SEIZING: | ||||||
| ||||||

| ||||||
|
Use ---- To bind ropes together or to bind a rope to an object. Sometimes used to bind the running end of a rope to the standing end of the rope to prevent a knot from spilling.
Comments ---- Seizings do not use as much material and are not as bulky as a knot or a splice; nor does the seizing damage the fiber of the rope. The fibers of a rope do not need to be bent or separated to be seized as they do when a knot is being tied or a splice worked. If the seizing is no longer needed, the seizing can be cut away and the rope is undamaged.
The seizings shown here can be worked with out the use of a needle. However there are many forms of seizing that require the use of a needle to apply them to a rope.
To form an eye, 3 to 4 seizing should be used. This ensures that the eye will safely remain in place even if one of the seizings is damaged.
If there is additional strain on the ropes, such as at the first seizing of an eye, racked turns should be used.
Materials ---- The diameter of the "twine" that is being used to do the seizing should be 1/8 to 1/12 the diameter of the rope being seized. The length of the "twine" should be about 3 feet for each 1 inch of diameter of the rope.
Narration ---- (For seizing knotboard.) (1) Fold a piece of twine in half over one strand of the rope. (2) Start the first layer of wrapping turns by laying the end of the twine that is between | ||||||
| ||||
|
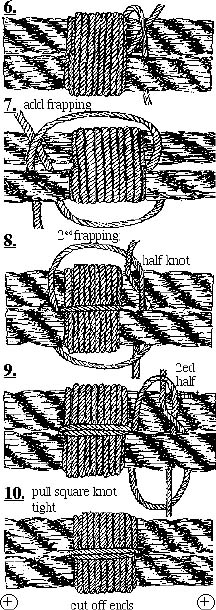
the ropes over the other end. (3) Wrap the outside strand around the ropes so that so that the wrapping turns are parallel to each other; pull each wrapping turn tight. (4) When the width of the wrapping is equal to the diameter of the rope, end the first layer of wrapping turns by reeving the twine between the ropes; pull tight. (5) Add a layer of riding turns; the riding turns are laid in the grove between the wrapping turns and pulled tight but not so tight as to separate the wrapping turns of the first layer. (6) When the riding turns have been completed, end the riding turns by reeving the end of the twine between the ropes so that it is in the opposite direction to the other end of the twine. (7) Add frapping turns; reeve the end of the twine between the ropes at the other end of the wrappings; pull tight. (8) Use a square knot to end the frapping turns: reeve the ends of the twine between the ropes again; tie a half knot; pull the half knot and the frapping turns tight. (9) Reeve the ends of the twine between the ropes again; tie the second half knot of the square knot. (10) Pull the second half knot tight so that the square knot is between the strands of the rope. Cut of the ends of the twine. | ||||